Preface
This post is a “blog-friendly” version of an old “paper” I wrote as a requirement for a special course for my University studies. The course was “CS-E4003 - Special Assignment in Computer Science” in Aalto University, Finland. I got 5 ECTS for this work.
The implementation of the rootkit described in this post and its installation instructions can be found from my github page - here.
Introduction
System Management Mode (SMM) rootkits are an interesting topic, since SMM is the most privileged mode in the modern x86_64 processors; it gives an execution environment with full access to every (physical) resource of the computer. In addition, SMM is a non-pre-emptive mode meaning that it cannot be interrupted by normal hardware/software interrupts. This allows completely stealth code execution from the execution context of the operating system.
When the SMM was first introduced in the beginning of 1990’s, it was a 16-bit operating mode similar to the real mode in 32-bit i386 and also in succeeding x86 processors. In x86_64 systems, the SMM still is a 16-bit mode, but is able to access memory over the 32-bit range by using on-demand paging. Before 2008 the SMM was rather simple to exploit, since the System Mode RAM (SMRAM) was not properly write-protected making it possible to install and run a simple rootkit even from ring 3 execution environment [3]. Nowadays the SMRAM cannot be written to from ring 3 or even ring 0 contexts since the it has been properly protected. This makes flashing the rootkit onto the motherboard’s SPI chip containing the Unified Extended Firmware Interface (UEFI) firmware the only reliable way for infecting the target. However, since the stealthiness and persistence of a rootkit located on the UEFI firmware are superior to of a bootkit or a kernel rootkit, the SMM rootkits will keep their place as an interesting attack vector.
Earlier research has mainly focused on hardware-logging based SMM rootkits that logged keystrokes from either a PS/2 or USB keyboard and sent the data over UDP by feeding the target PC’s NIC packets straight from SMM [3, 6]. There has also been some research about using SMM to circumvent operating system (OS) security functions [1, 4]. However, these studies concentrated on getting root access and doing data manipulation on an OpenBSD or GNU/Linux targets. The first study also used a vulnerability found in 2008 which made them able to overwrite SMRAM during OS runtime via a ring 3 process [1]. In 2017, Raucherberg et al. [5] released a paper with SMM rootkit framework implementation called “Longkit” for SeaBIOS systems. In their study, they presented a proof-of-concept attack implementation for reading the OS’s page tables and hooking its system calls.
This blog post describes the process of creating a malicious SMM module capable of bypassing the OS security by injecting code and patching OS process context structures straight from SMM. This enables code execution in the OS’s ring 3 context in a modern x86_64 environment running a modern operating system. This method could also be extended to get execution inside OS’s kernel (ring 0) execution context. The post describes creation of a proof-of-concept SMM rootkit using the UEFI Development Kit (UDK) as the framework to build the rootkit on, since many real-world hardware vendors seem to be using UDK as well as a base of their own customized UEFI firmwares. The motivation for this sort of attack could be the simplicity of creating an SMM module (a rootkit) using the UDK and the extended functionality provided by the OS once the code implant injected from SMM is running inside the OS context. Also, since the rootkit is installed on the UEFI firmware on the SPI chip, it is persistent to OS reinstalls, and can only be removed by reflashing the UEFI firmware.
Phases of developing a malicious SMM module
UEFI Development Kit & real hardware
The UEFI Development Kit (UDK) is a very feature-rich and well-documented open-source base implementation of the UEFI specification [2]. The source code can be found from their GitHub page and the documentation and other information about the project can be found from their website. UDK is the second version of EFI Development Kit (EDK II). EDK is based on Tiano, an early EFI implementation from Intel. EFI became UEFI in 2005 when other 10 companies joined Intel and formed an industry forum to standardize EFI.
Being open source, system board vendors may use UDK as a base for their own UEFI implementation and add possible tweaking tools and additional modules on top of the base. This seems to be the case for at least ASUS and HP with a sample of three system boards. On these boards’ firmwares (ASUS ROG STRIX Z370-F GAMING, ASUS VivoMini VM65N and HP EliteDesk 800 G2 SFF), some of the SMM modules from a dumped firmware image seem to match the implementation of a UDK base released before the UEFI firmware on said motherboard was released. This makes it easier to byte-patch some of the needed UDK parameters and functions with a simple static analysis and comparison between the locally-built UDK module and dumped module from the motherboard’s SPI chip. The modifications to the firmware will be discussed further in Section “Patching the original UEFI firmware” below.
Besides being easy to analyze and byte-patch the original firmware image, UDK also makes it easy to develop the malicious module. In the earlier research [1, 6, 5], the malicious SMM code had to be written in x86_64 assembly language, since it was injected straight to the SMRAM. However, since we are modifying the firmware image on the SPI chip, we can build the module with UDK and use C programming language for most of the parts.
SMM runtime, SMM modules and SMIs
During Platform Initialization (PI) in the bootup process, the Runtime SMM modules are loaded from the SPI chip to SMRAM. The SMRAM is then locked so that it cannot be accessed afterwards from other execution contexts besides SMM. During this stage, the loaded modules can register different protocol interfaces or lookup existing protocols provided by other modules. These protocols expose a list of function pointers that are defined by the said protocol, and they are registered and searched by their globally unique identifiers (GUIDs) which are 16 bytes long. The figure 1 shows how the structure of protocols is defined by the UEFI specification. There are two kinds of modules – Boot Services and Runtime Services. As the name implies, Boot Services are available only before the OS has loaded. Runtime Services are available both during the bootup and after the OS has started. [8]
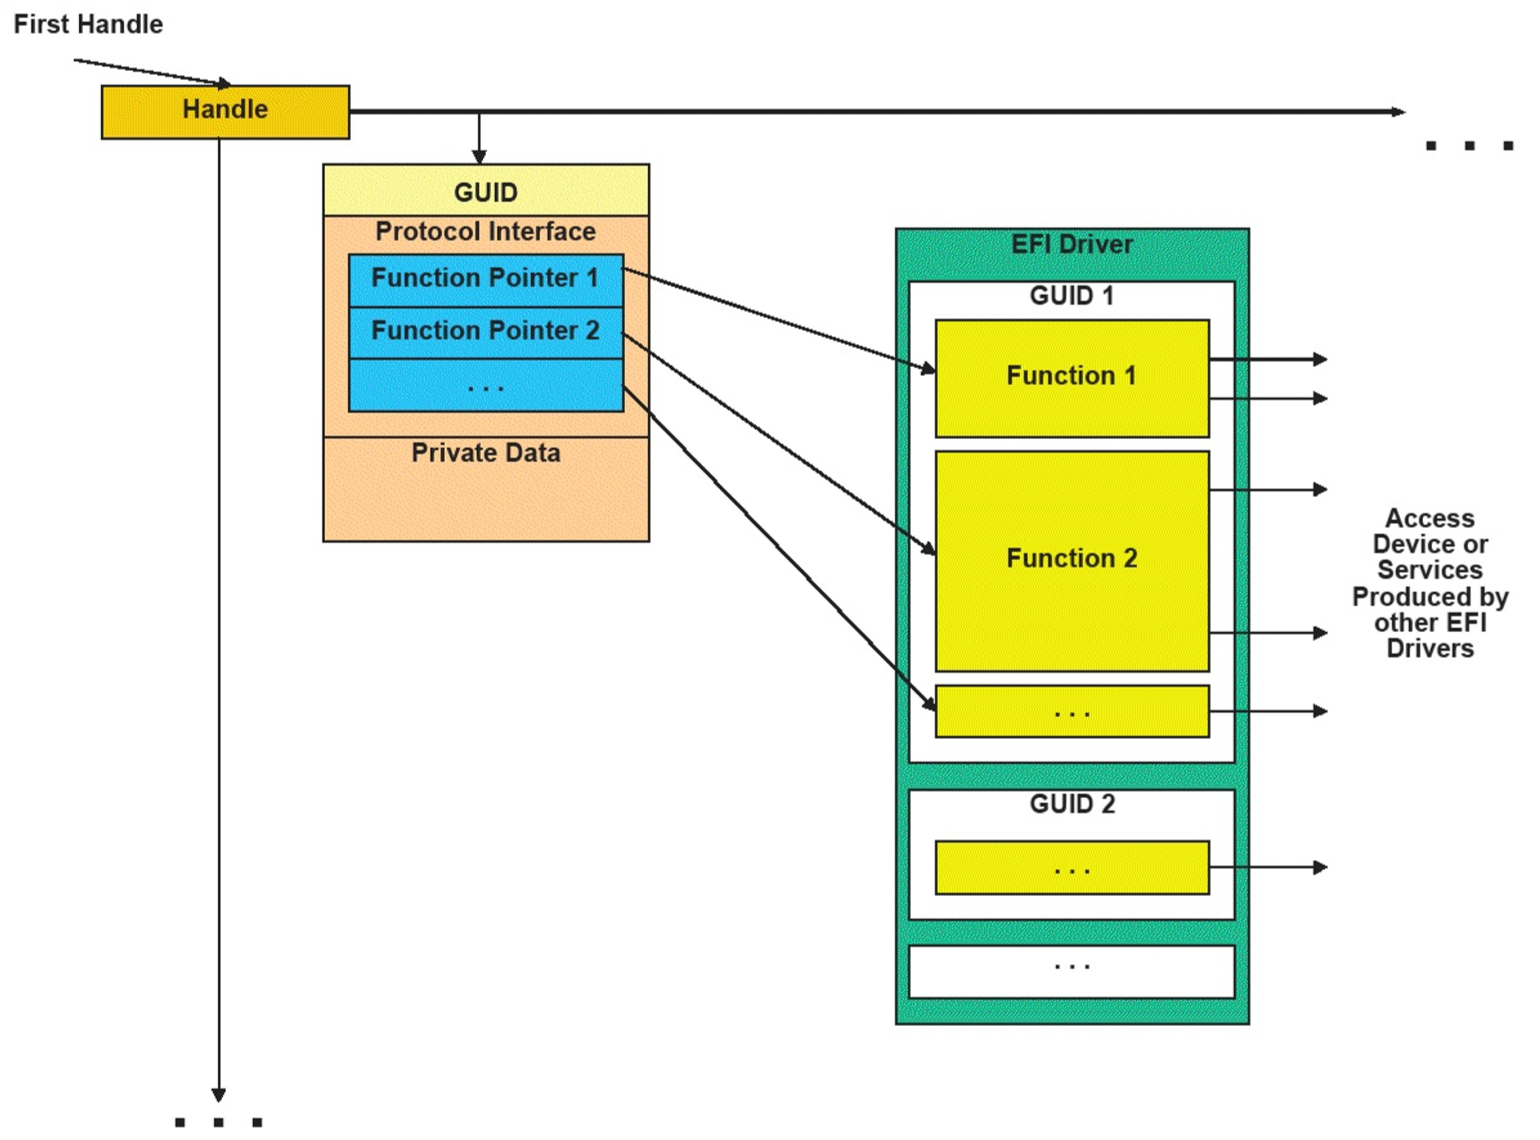 Figure 1: Construction of a UEFI protocol [8]
After the execution is handled to the OS and the CPU mode is set to either Protected or Long Mode, SMM can only be entered by invoking an System Management Interrupt (SMI) which is a hardware interrupt. There are different kinds of tricks to trigger an SMI from software too. One is to write to certain APIC-related registers. When the CPU receives an SMI, it syncs its threads, enters SMM and executes the SMI handler located on SMRAM. When CPU enters SMM, it also saves the current context of the CPU (the registers). When the SMI handler finishes its execution, it executes RSM instruction, which restores the saved CPU context to the CPU registers, exits SMM and continues executing in the Long/Protected Mode.
Accessing physical memory from SMM
As stated above, SMM was originally designed to be a 16-bit mode similar to Real Mode. Some relics of the old SMM from IA-32 can still be found from x86_64 processors of today. For example, in the modern x86_64 CPUs, SMM can access the first 4 gigabytes as a 32-bit linear address space in physical memory by default. However, the memory access can be extended to 64-bit address space simply by entering Long Mode while in SMM. This allows the SMM module to effectively access full memory space of a 64-bit computer. This is a crucial requirement for developing an abusive SMM module, since the operating system might be loaded to arbitrary address outside of the boundaries of 32-bit address space during the bootup process. Since the SMM module will be executing in Long Mode, using paging will become mandatory. For paging, the easiest way to access the full physical memory space is to identity-map the the memory, meaning that the resulting virtual addresses and physical addresses will always be the same. This method is also used in the Longkit framework developed and described by Raucherberg et al. [5].
Once the SMM module has the complete linear memory access, it should also be able to do pointer dereferencing inside the application or OS context. In theory this could be achieved by reading the CR3 register value from the CPU savestate context which was stored when the CPU entered SMM. However, the value in CR3 will obviously depend on the process executed by the CPU at the time the SMI was generated and SMM entered. Therefore it is more convenient to do a simple memory scan and try to find the target OS kernel or Page Map Level 4 (PML4) table by comparing the memory to a known memory pattern (signature) and use that information as a starting point for further OS-level exploitation. As an example, once the kernel entry and its PML4 table have been found, it is easy to traverse the process tree and access the virtual memory of the target process by using the kernel-specific data structures.
Proof-of-concept SMM rootkit against Windows
In this section, I will present how my proof-of-concept (PoC) SMM rootkit hijacks a Windows usermode process. As it was described in the preface section of this post, the full source code and building instructions for the PoC can be found from my GitHub.
Even though the following subsections will describe the process in greated depth, the basic concept is as follows: First the rootkit hijacks the execution flow of the process by hooking the Import Address Table (IAT) of the process. With IAT hooking it is possible to redirect the execution flow from the imported function from a linked Windows Dynamic-Link Library (DLL) to arbitrary code injected to the process’s memory context by the attacker. The rootkit code in SMM also patches some function calls of the arbitrary code to correspond to some linked DLLs’ exported functions by accessing the Export Address Table of the needed libraries inside the context of the process, so the arbitrary code can now call different functions defined in these libraries.
The text below describes how I used a Windows 10 build 1909 as the target,
and created a
target userspace executable
with Windows.h library bindings using kernel32.dll exports so that the
usermode shellcode
injected by our SMM PoC rootkit is able to create a new file and write
“Hello from SMM!” inside it using the functions CreateFileA and WriteFile.
Even though the rootkit was tested on build 1909 of Windows, it has been patched to work on version 2110 running kernel version 19041 (latest Win10).
Full 64-bit memory access from SMM
Since the SMM rootkit can access the full memory space by entering Long Mode
and after some tweaks to be discussed below in Section “Accessing physical
memory from SMM”, we can use various different open-sourced projects that
are used in similar attacks. The tools used in this project are modified
versions of vmread by Heep042,
PCILeech and
MemProcFS by Ulf Frisk. PCILeech was
originally developed for DMA attacks against various platforms, and vmread was
developed to read and analyze the physical memory of a virtual machine running
Windows as its guest OS. They both can read the physical address space, but
they need to acquire the context of the operating system to be able to
dereference virtual addresses, just like when attacking Windows from the SMM.
Some modifications to these tools needed to be made in order to make them work
in SMM because the tools’ need of dynamically allocated memory. In SMM there’s
no malloc :-) . However, it is possible to allocate runtime memory inside
SMM N pages at a time by using SmmAllocatePages. It is one of the
functions offered by EFI_SMM_SYSTEM_TABLE2 from the SmmBase2 protocol. In
my implementation, I use SmmAllocatePages once for allocating 100 pages
(100 * 4096 bytes) during the Driver Execution Environment (DXE, pre-OS time
during bootup) phase of the PI. For a simple dynamic memory access, I
implemented a rudimentary malloc to allocate smaller blocks of needed sizes
during runtime from this “slab” I allocated with SmmAllocatePages during the
module initialization. However, some of the memory allocations needed by the
three memory analyzing tools were excessively large, and therefore some code
was modified to actually read and analyze the memory directly in its original
physical location instead of copying it first to the local memory allocated by
the SMM.
For SMM, the rootkit allocates a local memory map which identity-maps the
virtual and physical memory - see InitUefiMemoryMap
in MemoryMapUEFI.c.
This is done by first getting the original memory map from the
Boot Services’s GetMemoryMap function. Boot Services is given to the SMM
module during the initialization phase (as a parameter to the UefiMain
function - see lBS initialization in the file
SMMRootkit.c).
This map is simply an array of EFI_MEMORY_DESCRIPTORs, that define the
mappings of virtual to physical addresses, type of the memory region, number
of pages in the region and also attributes for the mapped memory. Now, when
physical memory is accessed by our code, we can check its validity by checking
if the memory address to be accessed falls inside the physical address range
covered by the UEFI memory map.
Getting into Windows context and infecting the target process
For finding the Windows kernel (NTOS) and its PML4 we use some of the functionality
from modified version of vmread. For the code, see
Wintools.c.
After the the SMM module has acquired the required information of the Windows
kernel, the functionality from vmread can be furhter used to find the physical
address of PsInitialSystemProcess’s EPROCESS structure. This allows us to
traverse the process list to find the targeted process and its DirBase. The
process can be found by its name, in our case “smm_target.exe”. DirBase is
(obviously) the page directory of the process (which is loaded to CR3 register
when the process is being run). Acquiring it allows us to do memory address
translations inside the context of the process.
After the process has been found, it is trivial to also find its Import
Address Table (IAT) by dumping the PE header of the process. The PE header
contains Optional Header, which in turn contains Data Directory structure,
where the IAT is located. IAT is used when the process is calling a function
from a different module, in our target program the imported function is
GetCurrentProcessId from kernel32.dll.
IAT is needed because during compilation process, the linker does not know the actual addresses of these function calls when the program is executed. Since the IAT entries are indirect jumps to the desired APIs’ addresses, hooking one of the entries is an easy way to hijack the execution flow of the program.
A code cave is needed for the arbitrary code to be executed by the IAT hook. The code cave is searched by finding the PE sections of the process. These section structures contain the information of the real size of the object files when loaded (SizeOfRawData), and the actually allocated data for the object files (VirtualSize) [7]. If we can find a section with large-enough difference between these two, it means that we can write our own data to the area after the real size of the object files, since the end of the section is zero-padded.
Various code from PCIleech and MemProcFS is utilized to hook the IAT and find a codecave for the implant to be injected. The inserted shellcode in the codecave is then used to find the needed function exports from the kernel32.dll in the target process again by using functionality of PCIleech and MemProcFS and patch the function pointers of our implant code so that the functions can be called. The implementation of this procedure can be found from the WinUmdIATHook.c file of the project.
Infecting real-word hardware
QEMU/KVM virtual machine was used to test the malicious SMM module. In order to infect a real motherboard, one would need to flash the SPI chip, which contains the UEFI firmware, with a new firmware image that contains the rootkit module. On some motherboards, software tools like fptw64 (Flash Programming Tool for Windows 64 - I won’t put up a executable link here. If you want to try it, download and run it at your own risk) can be used to dump and flash the SPI chip without physical access to the chip on the motherboard. However, many motherboards have protection mechanisms to prevent writing of the firmware by using this kind of software tools, resulting in hardware-tool flashing being the only possible way to overwrite the existing firmware. For this project, three different motherboard models were sampled to test the rootkit on real-world hardware. As stated before, these boards were ASUS ROG STRIX Z370-F GAMING, ASUS VivoMini VM65N and HP EliteDesk 800 G2 SFF. On two of these boards (the ASUS ones) the boards allowed flashing the SPI chip by a physical tool, and successfully booted the modified firmware image. Unfortunately, the VivoMini PC died during the testing of the rootkit. This may have been because of a short circuit caused by incorrectly fitting the DIP-8 test clip on top of its SPI chip. This incident reminds that poking hardware can always cause severe hardware damage to the system in question. Also, the HP desktop PC had a security feature called HP Sure Start, which prevented patching and flashing of the SPI chip. However, all three motherboards used UDK as their base UEFI implementation.
The following subsections will describe the procedure to patch and flash the firmware of a real motherboard.
Dumping and flashing the SPI chip by hardware tools
To dump and flash the chip on a specific motherboard, the type of the SPI chip on said motherboard needs to be determined first. There are mainly two types of chips – SOIC-8/SOP-8 and DIP-8. The former can be usually found from newer boards, and the latter from older hardware. The attacker should also find the chip’s model and make from top of the chip. On smaller chips, a magnifying glass may be needed to read the text - it is quite tiny print! To dump and flash the firmware, the right clip needs to be wired according to the chip’s datasheet as shown in figure 2. For example, software tool called flashrom can be used to dump and flash the SPI once it was wired properly. Libreboot’s website has a well-written walkthrough of this process.
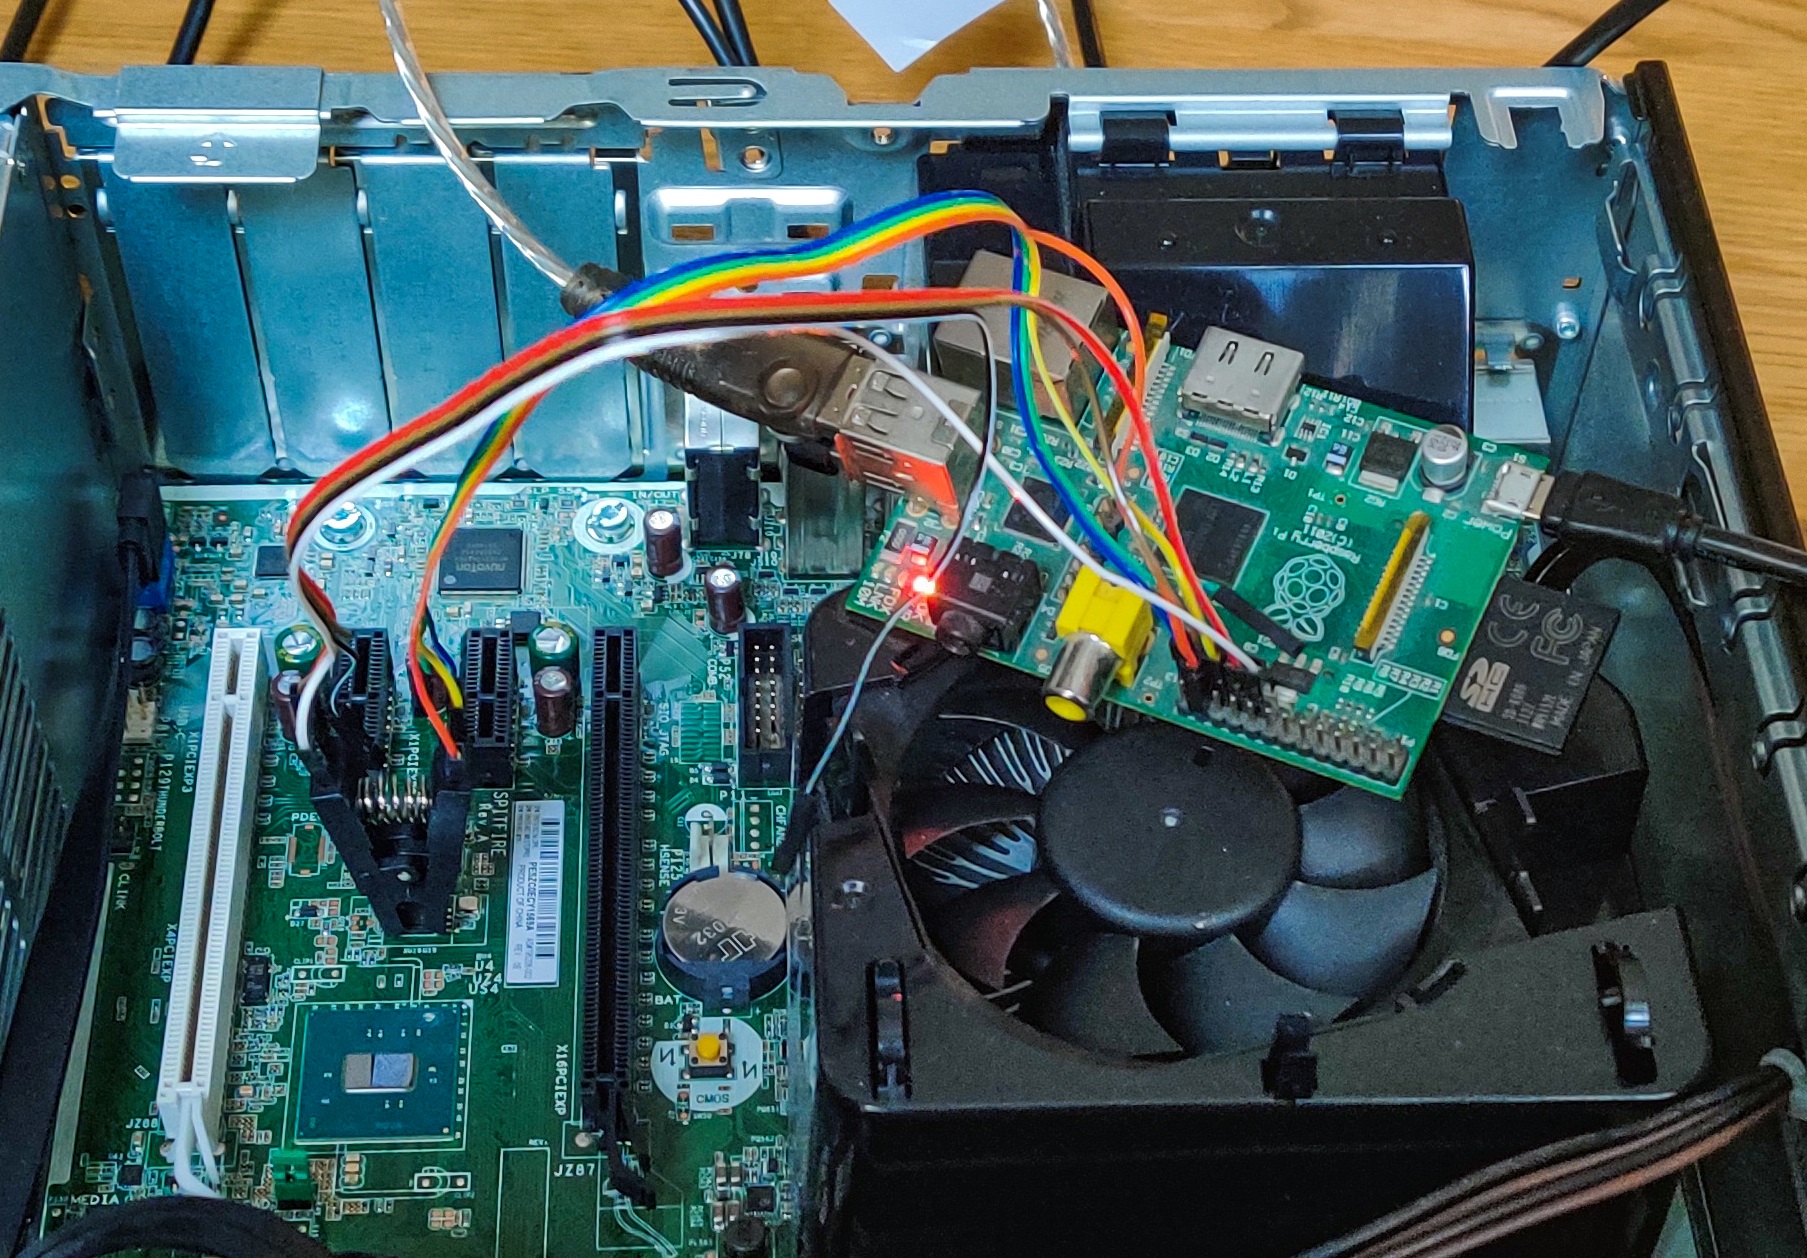 Figure 2: One of our test PCs, the HP EliteDesk, being flashed by a Raspberry Pi with
a SOIC-8 test clip.
Figure 2: One of our test PCs, the HP EliteDesk, being flashed by a Raspberry Pi with
a SOIC-8 test clip.
Patching the original firmware
In order to get a malicious SMM module to execute, an existing SMM module needs to replaced from the firmware image. This can be done after dumping the SPI chip successfully. In order to replace an existing module, the open-source software UEFITool can be used. UEFITool is a versatile firmware utility which allows the user to parse, extract and modify UEFI firmware images. It supports UEFI images, and even has an EDK2 GUID database which makes it even easier to check that the original image was built with UDK. The EDK2 GUID database for SMM modules also helps if a motherboard vendor tries to obfuscate the Text field of the SMM, DXE and PEI modules.
To overwrite a module with our own malicious one, one can import the original firmware image to UEFITool and choose the “Replace body” option on the “PE32 image section” entry under the SMM module and then choose the compiled .efi binary of the SMM rootkit. By doing this, the GUID and name of the module will not be changed, but the code section and the metadata of the PE image will, resulting in the SMM core to still load the module, as it thinks it is the original one that actually got replaced. The module to be replaced should obviously be some non-critical one which absense should not affect the operation of the machine. For example, which module’s PE image would you replace, FanControllerSmm’s or PiSmmCpuDxeSmm’s? :-)
On newer versions of UDK, there is a runtime page fault handler which by
default stalls the CPU if a page fault happens when the CPU operating in SMM
tries to access a memory address outside the SMRAM. This handler is located
inside the PiSmmCpuDxeSmm. In the example case of vUDK2018 tag of the EDK
II repository, which was used to build this SMM rootkit, the C implementation
can be found in function SmiPFHandler from the
PageTbl.c file.
There is also a boolean flag named
gUefiCpuPkgTokenSpaceGuid.PcdCpuSmmStaticPageTable inside the file
UefiCpuPkg.dec which allows SMM to use on-demand paging when set to false.
These need to be patched in order for our SMM rootkit to access the OS memory
area.
On some firmwares the page fault handler and flag for static page table do not exist at all, but those cases are mainly older versions of the firmware, when there was no such checks at all in the UDK base.
When testing the project inside a virtual machine, these patches can be
applied directly in EDK’s source files, since the PiSmmCpuDxeSmm module will
be built locally. My rootkit repository has pre-patched these source files
(PageTbl.c and UefiCpuPkg.dec) for the vUDK2018 tag of EDK II. However, with
a dumped PiSmmCpuDxeSmm binary from a real motherboard, the page fault
handler can be patched with a sophisticated reverse engineering software such
as Ghidra or IDA Pro by searching for an endless loop inside the dumped
module (CpuDeadLoop in PageTbl.c). After the module is patched, the original
one inside the firmware image can be replaced by using the same procedure
described above for overwriting an SMM module with arbitrary malicious SMM
module binary.
You should now have a malicious SMM module that is able to infect a ring-3 (user mode) Windows 10 process and persist between OS reinstalls!
References
[1] Loıc Duflot, Daniel Etiemble, and Olivier Grumelard. “Using CPU system management mode to circumvent operating system security functions”. In: CanSecWest/core06 (2006).
[2] Unified EFI. “Unified extensible firmware interface specification”. In: Version 2.7 (2017).
[3] Shawn Embleton, Sherri Sparks, and Cliff C Zou. “SMM rootkit: a new breed of OS independent malware”. In: Security and Communication Networks 6.12 (2013), pp. 1590–1605.
[4] Xeno Kovah and Corey Kallenberg. “How Many Million BIOSes Would you Like to Infect?” In: Vancouver, BC, Canada). CanSecWest (2015).
[5] Julian Rauchberger, Robert Luh, and Sebastian Schrittwieser. “Longkit-A Universal Framework for BIOS/UEFI Rootkits in System Management Mode.” In: ICISSP. 2017, pp. 346–353.
[6] Joshua Schiffman and David Kaplan. “The SMM rootkit revisited: Fun with USB”. In: 2014 Ninth International Conference on Availability, Reliability and Security. IEEE. 2014, pp. 279–286.
[7] Pavel Yosifovich, David A Solomon, and Alex Ionescu. Windows Internals, Part 1: System architecture, processes, threads, memory management, and more. Microsoft Press, 2017.
[8] Vincent Zimmer, Michael Rothman, and Suresh Marisetty. Beyond BIOS: developing with the Unified Extensible Firmware Interface. Walter de Gruyter GmbH & Co KG, 2017.